To render a sprite (a 2D texture) there are three main steps that need to be followed. These steps are as follows:
- Add an image to your project so that it can be accessed in your code.
- Create a Texture2D variable in your project and load the texture image into that variable using the Content Pipeline.
- Draw the texture onto the screen with certain parameters that you would like to be applied to the texture.
First, before you can draw the texture, you need to be able to access the texture you want to draw. Through a system called the Content Pipeline, you can load different content files into your project and then access them using a ContentManager. Though this process is important, we first need to load an image into our project.
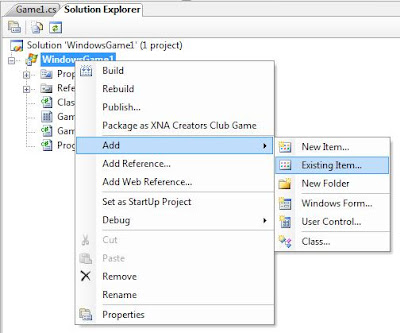
To load an image, you need to first navigate to your Solution Explorer (View / Solution Explorer). After this, right click on the name of your project and select Add / Existing Item.

Figure 1: Right click on the name of your project and select Add / Existing Item
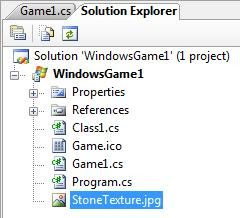
You should now be taken to a page where you can browse through your computer files. What you want to do is browse to where a simple texture is located. Once you have located where the file should be, in the Files of Type drop-down box, switch to Content Pipeline Files. This option shows all files that XNA will allow to be added to your project. Most likely, your image is of file type TGA, PNG, BMP, JPG, or DDS, all of which can be added into your project. Once your file is select, click Add. The file now should be added to your Solution Explorer where you can see it:

Figure 2: You can now see the texture file inside of your Solution Explorer. My texture was a JPG file called StoneTexture.
Creating a Variable to Hold the Texture
After loading an image into our project, we can now create a variable to contain that image data. This variable will then be used to draw the image onto the screen.
First, because our texture is a 2D image, we want to create a variable of type Texture2D. Create this variable at the top of the class near the GraphicsDeviceManager and ContentManager variables.
//The texture variable that will hold our image data.
Next, we need to initialize this variable. With most variables, you call the constructor of the class to create it. Unlike these classes, all content-related variables are created by directly loading them with a file. For our case, this will be the texture loaded into our project. Because of graphics device related issues which do not need to be explained in this lesson, put this code inside of the if (loadAllContent) statement of the LoadGraphicsContent method. This code initializes our Texture2D:
/*Use the ContentManager content variable to initialize
the Texture2D with a real texture.*/
texture = content.Load[Texture2D]
Code Note: The brackets in the above code should actually be tags. I needed to use brackets because the HTML would not allow tags.
This code statement may look long and confusing but it is quite simple. We call the Load method of a ContentManager variable named content (created by default). Then we specify for the method that we are loading a Texture2D and that the texture name is “StoneTexture” (for you that will probably be different). That is really all there is to that line.
Drawing the Texture Using the SpriteBatch
Finally, we have come to the part where we can display our texture. Using the SpriteBatch class and its Draw method, we can easily draw our texture.
Note: To draw a sprite means the same thing as to render a sprite.
The first step is to create the SpriteBatch. At the top of the class along with the other variable declarations, create a SpriteBatch:
//The SpriteBatch we will use to draw the texture.
SpriteBatch spriteBatch;
Now, we can initialize it. Inside of the Initialize method, add this code to initialize our SpriteBatch:
//Initialize the SpriteBatch.
spriteBatch = new SpriteBatch(graphics.GraphicsDevice);
The constructor for the SpriteBatch needs a GraphicsDevice. We access one by using the GraphicsDevice property inside of our GraphicsDeviceManager variable.
Since our SpriteBatch has now been created, we can now use it. The following calls to the SpriteBatch class will be placed in the Draw method right after the graphics.GraphicsDevice.Clear(Color.CornflowerBlue); line.
First, we need to start the SpriteBatch. The reason for doing this is to set any needed parameters for the SpriteBatch. These parameters are things such as allowing the ability to take transparency into account or setting the way the SpriteBatch will sort the sprites. Place this code into the Draw method:
/*Start the SpriteBatch. Your sprite may contain transparency so we allow Alpha-Blending.*/
spriteBatch.Begin(SpriteBlendMode.AlphaBlend);
Next, we want to draw the sprite. Place this code right after the previous line:
//Draw the sprite.
spriteBatch.Draw(texture, new Vector2(0, 0), Color.White);
We draw the sprite by calling the Draw method of the SpriteBatch variable. The first parameter is the Texture2D that we want to draw. We pass in texture. The next parameter is the position to draw the sprite at. This value is stored in a Vector2. For us, we specify 0, 0, which means that the origin of the sprite will be drawn at that position. The final parameter is the color to taint the background of the sprite with. We want the sprite to look completely normal so we specify Color.White.
Note: The default origin of the sprite is at the top-left corner of the sprite. To change this, a different overload of Draw needs to be called.
Finally, we need to “end” the SpriteBatch. There are two purposes for this. One is that instead of the sprites being drawn at the moment you call the Draw method, they are actually added to a list. Once End is called, all the sprites in the list are drawn at once. This is actually more efficient. The second reason is to reset the different values you changed when you called the Begin method. The different values are changed back to their default value until you call the Begin method again. After the two previous calls to the SpriteBatch, place this final statement:
//End the SpriteBatch.
spriteBatch.End();
Congratulations! You have now successfully coded a small application that renders a sprite onto the screen. Running the project now should result in your sprite drawn at the top-left corner of the screen (because we specified 0, 0 for the position).
Figure 3: After completing this lesson, you should hopefully see a result resembling this screen-shot.
I do hope that you have been able to solve some confusion by reading this lesson and I fully hope that you can easily continue along with your gaming quest. If you find any errors or mistakes, or if any parts of this lesson were confusing, please post a comment so that I can fix it. Thanks again.
No comments:
Post a Comment